Important Information...
Online Policies
International Sales
Shipping and Returns
Your Privacy Matters
Talk to Us!
PREFERRED TWO PUMP INSTALLATION
A two pump system is the preferred system of boat builders wanting to provide a superior livewell. A simple two pump system provides a back-up in the event of pump failure.
FIRST SYSTEM: Install a standard live well pump such as a 200, 500, 800, or 1100 GPH pump to exchange water occasionally in the well (see one pump diagram below). When using a ¾” pump inlet, a 1 ½” drain is required.
 SECOND SYSTEM: Install either a 700 GPH or 1100 GPH pump. This will allow fish to remain healthy while the standard live well pump is off when the boat is in contaminated water, or when the pump is air-locked. Many boats have the live well pump installed on the transom. When the boat is on a plane, the intake of the pump is out of the water and is ineffective. The boat can also be trailered while the bait remains in the live well. This system always remains on while fish are in the well.
ONE PUMP INSTALLATION
The one pump system utilizes the KA700TS, or KA1100TS and takes outside water and aerates it directly into the well. The two pump installation is preferable to the one pump installation since bait or fish can remain in the live well when trailering.

_______________________________________
COMMON INSTALLATION PROBLEMS
1. Pump operates but no bubbles.
Brown Lead is not connected to Positive side of the battery.
Battery is not fully charged.
2. Suction cups do not stick to bottom of tank.
Use a very slick ceramic tile (approximately 20cm by 20 cm) for the suction cups.
The weight of the tile will keep the pump in place.
3. Does not appear to operate in fresh water.
Bubbles are extremely difficult to see in fresh water.
Bubbles are easy to see in salt water because bubbles illuminate the salt. Hold hand in front of the pump outlet and watch bubbles collect on the back of your hand.
4. Pump running does not pump water.
REMEMBER THIS IMPORTANT TIP
REMEMBER…..
ALWAYS KEEP YOUR FILTERS CLEAN!VISUAL DIFFERENCES BETWEEN SALTWATER AND FRESH WATER: In saltwater, bubbles are readily seen due to the illumination of the salt. In freshwater, almost nothing can be seen. The dust sized bubbles are extremely hard to see. Put your hand in the water and watch the millions of micro-fine bubbles gathering on your skin.
- Foam on the surface is fish waste, and can be skimmed off. Foam does not interfere with the aeration process.
- Control your water flow with the Air Control Valve..
- Adjust the speed of water with the Air Control, so fish school in a stationary position. Opening the valve produces larger bubbles as well as the micro-bubbles, and slows the water flow. Closing the valve will increase water flow and the larger bubbles begin to disappear. Each fish species will have their own swimming speed, so water flow must be adjusted for each species.
For a better understanding, please read our LESSON IN AIR BUBBLES
IMPORTANT INSTRUCTIONS
FOR FRESH WATER PLEASE READ!This product works equally well in both fresh and salt water. You may have seen a picture or display of a unit in salt water producing large numbers of visible bubbles. Operating in salt water, provides a much more dramatic VISUAL display than fresh water.
To ensure that your Infusor is operating properly, LISTEN for the sound of air at the Air Control Valve.
IN FRESH WATER, the Infusor produces many sizes of bubbles. The larger bubbles, although highly visible, do very little in oxygenating the water. They rise too quickly. The Infusor produces millions of dust size bubbles that remain suspended in the water longer and are virtually invisible to the naked eye, unless you place a strong light on the water and observe from the side, as in an aquarium.
A SIMPLE PROCEDURE TO ENSURE THAT YOUR UNIT IS OPERATING PROPERLY, IS TO PLACE YOUR HAND IN THE WATER AND WATCH THE BUBBLES COLLECT ON YOUR HAND.
REMEMBER THAT THE BROWN LEAD GOES TO THE POSITIVE (+) SIDE OF THE BATTERY.
INSTRUCTIONS FOR ALL PUMPS AND ACCESSORIES:
Operation of the Air Inlet Valve: When your unit is provided with a 1/8″ air check valve, install it in line next to the Air Control Center with a small portion of the air hose provided. It is recommended that all threaded fittings must have no less than pipe thread tape sealant.
ALWAYS DOUBLE CHECK FOR LEAKS!
THRU-HULL MODELS:
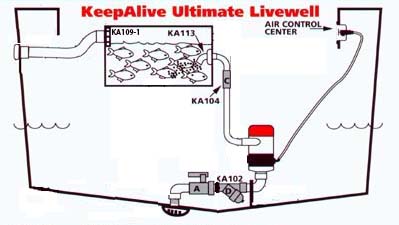
To install the thru-hull models we recommend you follow the live well diagram and instructions below as a general guide. There are too many different hull and live well designs for only one type of installation. Buy only the best components for your system.
Tips
- Always use a ball valve at the thru-hull pickup.
- Always use strainer to prevent pump from clogging.
- Clean strainer frequently.
- Be sure drain size is large enough to accommodate pump.
RECIRCULATING KIT INSTALLATION:
1. Pump must be tilted at a 45° angle on completed installation so all air can escape upwards.
2. Drill a 1 1/16″ hole for the pump base.
3. Measure and cut off excess threads. Leave enough length to attach strainer. Insert pump and tighten.
4 Drill a 1⅞” hole higher than the pump outlet and install the Directional Discharge provided. Use a waterproof sealant and tighten.
5. Install a smooth vinyl hose between Directional Discharge and pump.TANK INSTALLATION
1. Adjust the lid twist locks to the desired tension.
2. Attach air hose firmly to the back of the black Air Control
3. Run pump leads though the hole next to the Air Control Center. Recommend an overhand knot in the wires before inserting the wires through the hole. This will prevent pump from being pulled off the bottom of the tank.
4. Attach copper and s/s electrical clips to the wires.
5. Tanks with installed Hold Down Plates for Infusers on bottom of tank.BROWN LEAD IS POSITIVE!
CONTROL WATER SPEED WITH THE AIR CONTROL VALVE
Important Information...
Online Policies
International Sales
Shipping and Returns
Your Privacy Matters
Talk to Us!
100% Satisfaction Guaranteed!
Boater’s Catalog
6240 105th Terrace N.
Pinellas Park, FL 33782
Tel: (800) 745-0765

No products in the cart.
